Colouring Line Art
By Melissa Evans
Tutorial Links: Page 1 | Page 2 Page 3 Page 4 | Page 5 | Page 6
STEP 2: Adding Colour
Now that your have separated your line art in STEP 1, it’s time to colour with Photoshop…
I love colouring in Photoshop. I used to experience extreme anxiety colouring my line art when I used pens or paint…every colour choice could be a mistake that would ruin my picture, and I may have to start over again from the beginning.
Using fill layers is the best way to colour if you are indecisive about your colour palette. So let’s begin this tutorial and see how it works…
b) Creating MORE Fill Layers
Repeat the above step creating a new fill layer for each colour/item in your picture.

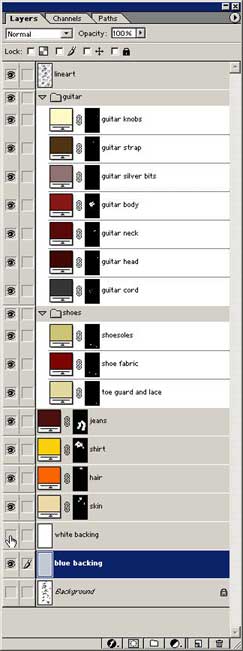
Turn off the visibility of the “white backing” layer (click the eye icon) when you are shading a layer with a colour close to white. See above image. Now you know what the “blue backing” layer is for.
Make sure all your new fill layers are positioned below your “line art” layer and that you name each layer appropriately.
If you have multiple layers for a single item, you can organise them into a folder (known as a set). To create a new set, simply click this icon (![]() ) at the bottom of the layers window. Place layers into a set by click dragging them onto the set. To rename a set is the same process as renaming a layer.
) at the bottom of the layers window. Place layers into a set by click dragging them onto the set. To rename a set is the same process as renaming a layer.

The image above shows all the fill layers I used and how I organised them. It may take a while to create all your fill layers, so remember to Save regularly!
c) Versatility of the Fill Layer
This is my favourite part…

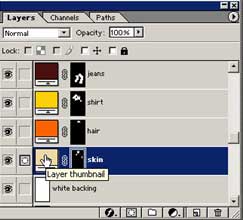
At any time if you are unhappy with a colour that you have chosen, simply double click on the Layer Thumbnail (as shown above) and re-select a colour. Now you have the ability to change the colour of his hair for example, to a whole new colour in a second flat!! Indecisive picture colourers of the world unite and cheer!!!
If you are working commercially, this technique is great for your client too. Imagine how impressed they will be when you can deliver all the colour changes that they require in seconds!

Finally don’t forget to Save!
Congratulations, you now ready for …
STEP 3: Adding Depth and Highlights >>
Tutorial Links: Page 1 | Page 2 Page 3 Page 4 | Page 5 | Page 6
